Quickstart and Evaluation Guide for Tuxera Fusion SMB
Introduction
This is an introductory guide to Fusion SMB, designed to help you quickly evaluate the product and its benefits in your environment.
What You'll Learn in This Guide
By reading and following the instructions in this guide, you'll learn:
-
What Tuxera Fusion SMB is, its advantages over Samba and other solutions, and its key features:
This section provides a brief, yet comprehensive overview of Fusion SMB, highlighting its key features, and demonstrating how it benefits your use case. You will understand how Fusion SMB stands out from open-source alternatives, enhancing your file-sharing experience.
-
How to Perform a Simple Installation and Configuration for Evaluation Purposes:
Step-by-step instructions will guide you through the installation and initial configuration of Fusion SMB. This includes setting up the server, configuring essential settings, and preparing the system for evaluation. You'll gain practical knowledge to get Fusion SMB up and running quickly and efficiently.
-
How to Test the Product and Its Performance in Your Environment:
Learn how to evaluate Fusion SMB's performance within your specific environment. We will cover some testing methodologies, performance metrics, and their meaning. By the end, you'll be equipped to assess the server's capabilities and determine its suitability for your use case.
The Use Case Described in this Guide
This guide focuses on a straightforward use case, designed for simplicity and quick evaluation. While this setup may not reflect your final deployment requirements, it demonstrates the server in action and provides a foundation for testing its performance and basic features.
The use case includes the following components:
-
Single Server, No Scale-Out, No Clustering:
The setup involves deploying Fusion SMB on a single server. Although this may not meet your eventual requirements, it allows you to evaluate the product's core functionality and performance, without the complexity of configuring scale-out or clustering.
-
File-Backed User Database, No Active Directory Integration:
The guide uses a file-backed user database, avoiding the added complexity of Active Directory integration. This configuration ensures a quick and easy setup for evaluation purposes. However, full Active Directory integration is available if required.
-
Single Share, Open to the Entire Network:
The setup creates a single file share that is accessible to the entire network. Based on your eventual needs, it's easy to expand this configuration to as many shares as you require, with different access permissions and security settings–this guide provides the foundation for making such customizations.
-
A Windows Client for Testing:
To validate the setup, and run some performance tests, this guide includes instructions for testing the file share using a Windows client. This involves connecting to the share from a Windows machine, performing basic file operations, and verifying that the server meets performance and reliability expectations.
What is Tuxera Fusion SMB?
Fusion SMB is a high-performance SMB stack for Linux, designed to enable seamless file sharing across Windows, macOS, and Linux environments.
Built for exceptional performance and minimal latency, its multi-threaded architecture ensures efficient utilization of system resources. This design allows Fusion SMB to handle numerous concurrent connections with high-bandwidth data transfers, while maintaining business continuity, security, and industry-leading compliance with the SMB standard.
Advantages over Samba and Other Open-Source Alternatives
Samba and other open-source SMB implementations provide valuable and flexible file sharing solutions, but these options often fall short of meeting the performance and scalability requirements of a demanding enterprise environment. Fusion SMB surpasses these alternatives in performance, scalability, compatibility, and ease of integration into your solutions, all while providing industry-leading support.
What sets Fusion SMB apart from other solutions:
The Highest-Performing SMB Implementation
Fusion SMB is the highest-performing SMB implementation on the market. As the only multi-threaded SMB for Linux, it's uniquely positioned to take full advantage of modern CPU architectures, delivering exceptional throughput with minimal latency while handing a large number of concurrent connections.
Unlike Samba, which typically maxes out around 2.5 GB/s, Fusion SMB can fully saturate even the fastest network connections, reaching throughputs of 25 GB/s when network and storage conditions permit.
The Definitive SMB Server for Linux, Backed by a Partnership with Microsoft
As an official Microsoft SMB partner and SMB patent licensee, Tuxera ensures that Fusion SMB fully complies with Microsoft's SMB protocol standards. This partnership ensures a reliable and up-to-date SMB implementation, while leveraging the latest advancements and support from Microsoft.
SMB Direct Support Powered by RDMA
Support for SMB Direct in Fusion SMB enables maximum data transfer rates while minimizing CPU usage in environments equipped with RDMA-capable hardware.
Small Footprint
Fusion SMB's lightweight design makes it suitable for embedded systems and white-label solutions. Its minimal resource requirements allow deployment across a wide range of hardware platforms without compromising performance or functionality.
Embedded and White-Label Friendly
Fusion SMB is designed for seamless integration into customer solutions. Its flexibility and efficient resource utilization make it ideal for embedded applications and OEM solutions, ensuring compatibility without disrupting existing features.
Highly Tunable
Fusion SMB offers extensive configuration options, enabling fine-tuning to meet specific performance and security requirements. This versatility makes it suitable for diverse environments.
Comprehensive Support
Fusion SMB is backed by Tuxera and its partnership with Microsoft. Your engineering teams can rely on detailed documentation, training, and expert support services to ensure seamless integration and operation within your solutions.
Additional Key Features
Continuous and High Availability
Fusion SMB ensures business continuity by keeping mission-critical file shares accessible, even during server updates or unexpected outages.
Active Directory Integration
Fusion SMB integrates with Microsoft Active Directory for centralized user management and authentication, ensuring smooth operation within Windows domain environments.
Versatile Interoperability
Fusion SMB can run alongside other file services, such as NFS. This flexibility allows you to add SMB file sharing features to your product or service without disrupting existing functionalities.
Enhanced Security
Fusion SMB supports Kerberos authentication, encryption in transit, and message signing, ensuring robust network-level security for user logins and data traffic. Additionally, it offers a highly configurable permission model and ACL support to protect against unauthorized access, along with extensive auditing capabilities.
Prerequisites
Before starting the installation and configuration of Fusion SMB, ensure the following prerequisites are met:
-
Setup Prerequisites
To make sure your setup in on a supported configuration, see the server and client requirements sections below.
-
Performance Testing Prerequisites
For accurate performance testing, ensure that your network and storage subsystems can handle the expected data transfer rates, especially in terms of network and disk throughput.
For example, If you aim to test Fusion SMB's ability to saturate a 10 Gbps network connection:
- Confirm that the network connection between the server and the client can handle 10 Gbps.
- Ensure that the server's storage devices can sustain 10 Gbps (~1.25 GB/s) throughput.
Server Requirements
This section outlines the requirements for the machine where you will install Fusion SMB.
- Operating System: Linux.
- Network:
- Ensure TCP port 445 is open on all firewalls between the server and the client machine.
- Throughput: Verify that the network connection can handle your performance requirements.
- Shared Directory:
- Size: 10 GB of available disk space
- File system: Any file system supported by the kernel
- Throughput: Ensure the storage device hosting the shared directory can meet your performance requirements.
Client Requirements
This section describes the requirements for the machine that will access the SMB share provided by Fusion SMB.
- Operating system: Windows 10, 11, or Windows Server 2016, 2019, 2022, 2025 connected to the same network as the server.
- Network:
- Ensure TCP port 445 is open in any firewalls between the client and the server.
- Throughput: Depending on your performance requirements, ensure that the network connection between the client and the server can handle the expected data transfer rates.
Installing Tuxera Fusion SMB
Fusion SMB is distributed as a compressed archive containing essential binary files and configuration templates. Typically, the archive's name resembles tuxera-smb-3024.3.22.1-r1-x86_64-jammy-user-evaluation-cluster.tgz.
Package Contents
| File | Description |
|---|---|
smb/bin/tsmb-server | The main Fusion SMB executable. |
smb/tools/tsmb-privilege | A utility for managing the privilege database. |
smb/tools/tsmb-status | A utility for displaying server status and statistics. |
smb/tools/tsmb-acls | A utility for managing Access Control Lists (ACLs). |
smb/tools/tsmb-passwd | A utility for manipulating the user database. |
smb/tools/tsmb-cfg | A utility for managing the configuration at runtime. |
smb/conf/tsmb.conf | A configuration file template. |
smb/README.SMB | A README file with additional information. |
smb/LICENSES.SMB | A file containing license information for third-party components. |
VERSION-INFO | A file detailing the version of the package. |
Installation
To install Fusion SMB, extract the contents of the archive and place them in the relevant system directories:
In this example, the files are placed in the following directories:
- The main Fusion SMB executable is placed in
/usr/sbin - The utilities are placed in
/usr/bin
These paths are typical for Linux server setups and are included in most users' $PATH environment variable. However, you can adjust the installation directories to suit your environment.
-
Extract the archive:
tar -xzf tuxera-smb-3024.3.22.1-r1-x86_64-jammy-user-evaluation-cluster.tgz -
Navigate to the extracted directory:
cd tuxera-smb-3024.3.22.1-r1-x86_64-jammy-user-evaluation-cluster -
Copy the Tuxera Fusion SMB binary to
/usr/sbin, or a location of your choice:sudo cp -af smb/bin/tsmb-server /usr/sbin/tsmb-server -
Copy the utilities to
/usr/bin, or a location of your choice:sudo cp -af smb/tools/* /usr/bin/
Configuring Tuxera Fusion SMB
Before starting Fusion SMB, configure it and create a user. The configuration file, located at /etc/tsmb.conf, contains settings that control the server's behavior.
Follow all steps after editing the configuration file to ensure proper setup.
The /etc/tsmb.conf Configuration File
The configuration file is organized into sections, each containing a list of key-value pairs. The [global] section (which MUST come first) defines general server configuration. Subsequent [share] sections define the SMB shares:
[global]
    # . . . Global settings . . .
[/global]

[share]
    # . . . A share's settings . . .
[/share]

[share]
    # . . . Another share's settings . . .
[/share]

# . . .
Edit the /etc/tsmb.conf configuration file to set up a simple share, according to the use case described earlier:
- Under
[global]:- Set the user database type to
text:userdb_type = text - Set the user database file to
/etc/tsmb-shadow:userdb_file = /etc/tsmb-shadow - Set the auxiliary directory to
/var/lib/tsmb:runstate_dir = /var/lib/tsmb - Configure the server to listen on all interfaces on port 445, the standard TCP port for SMB:
listen = ANY,0.0.0.0,IPv4,445,DIRECT_TCP - Disable continuous availability and scale-out since we're creating a single-server setup:
ca = false
scale_out = false
- Set the user database type to
- Under
[share]:- Create a share named
SH1with the path/export/share, and grant full permissions to everyone:netname = SH1
remark = Test Share
path = /export/share
permissions = everyone:full
- Create a share named
Below is the resulting configuration file with annotations for clarity:
## Global must come first
[global]

    # The type of the user database. `text` means a file-backed database
    userdb_type = text

    # The location of the user database file
    userdb_file = /etc/tsmb-shadow

    # The directory where the server stores its auxiliary and runtime files
    runstate_dir = /var/lib/tsmb

    # The network interfaces and ports the server listens on
    listen = ANY,0.0.0.0,IPv4,445,DIRECT_TCP

    # Continuous availability and scale-out, disabled for single-server setup
    ca = false
    scale_out = false
[/global]

# Share definitions
[share]

    # The name of the share, as visibile from the clients
    netname = SH1

    # A description of the share
    remark = Test Share

    # The path to the shared directory
    path = /export/share

    # The permissions for the share
    permissions = everyone:full
[/share]
Setting Up Important Files and Paths
Before starting Fusion SMB, ensure the required files and paths mentioned in the configuration file are created and prepared:
-
The User Database File:
Create the user database file,
/etc/tsmb-shadowand set its permissions so that only the root user can read and write to it:sudo touch /etc/tsmb-shadow
sudo chmod 600 /etc/tsmb-shadow -
The Auxiliary Directory:
Create the auxiliary directory
/var/lib/tsmb:sudo mkdir -p /var/lib/tsmb -
The Shared Directory:
Create the shared directory
/export/shareand configure it with rather promiscuous permissions, since it's for testing purposes only:sudo mkdir -p /export/share
sudo chmod 777 /export/sharenoteThe above commands assume the shared directory resides on the root file system. If it doesn't, mount it first using
mount, before setting the permissions withchmod.
Creating an SMB User
To create an SMB user, add an entry to the user database using the tsmb-passwd utility:
sudo /usr/bin/tsmb-passwd -a smbuser
You will be prompted to enter a password for the user. Once completed, the user is added to the user database at /etc/tsmb-shadow.
Starting Tuxera Fusion SMB
With the configuration done and the necessary files and directories created, start Fusion SMB. For testing purposes, run it in the foreground to observe the output:
sudo /usr/sbin/tsmb-server
If you chose a different location for the configuration file, specify it with the -c option:
sudo /usr/sbin/tsmb-server -c /path/to/your/tsmb.conf
Connecting to Fusion SMB
With Fusion SMB running, connect to it from a client machine:
In this example, the server's IP address is 10.210.0.3. Replace this with the actual IP address of your server.
-
Connect to the Server:
On your Windows client machine, press Win-R to open the Run dialog, and enter the server's UNC address (
\\followed by the IP address):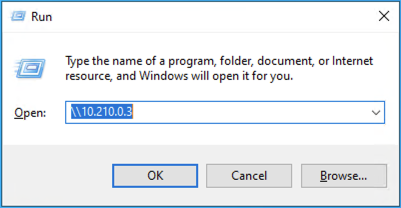
-
Authenticate:
You will be prompted to enter the username (
smbuser) and password for the SMB user created earlier. -
Map the Share to a Drive:
-
Right-click on the
sh1share, and selectMap network drive...: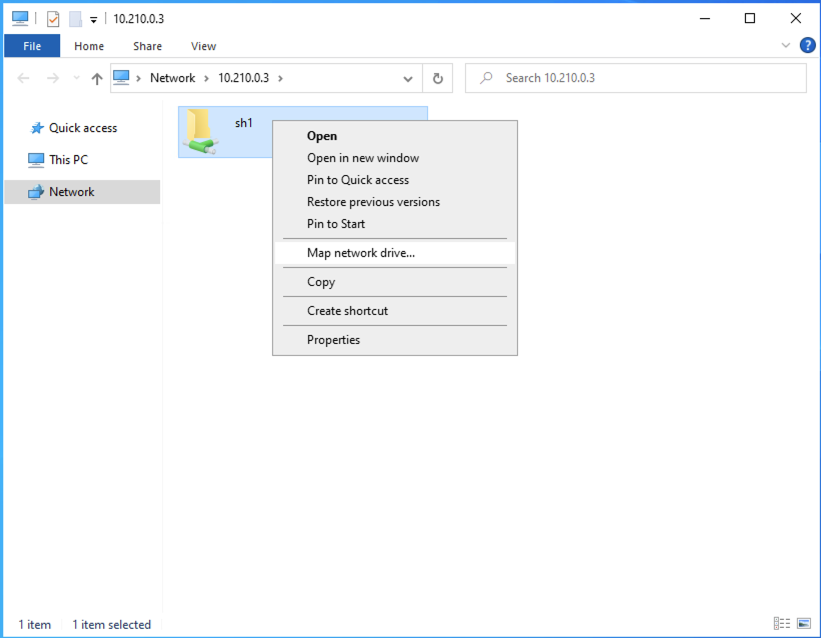
-
Assign a drive letter (in this case,
Z:), and click Finish: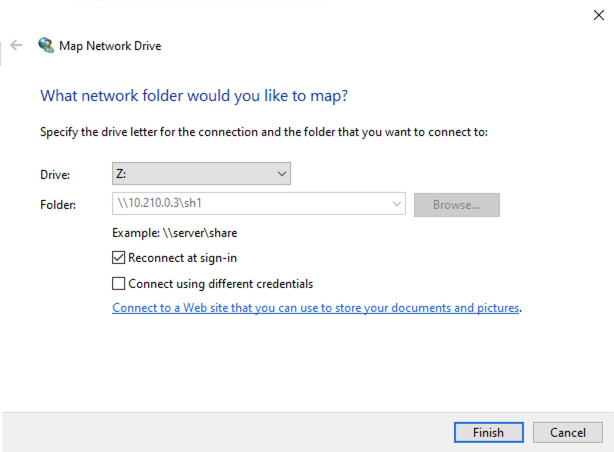
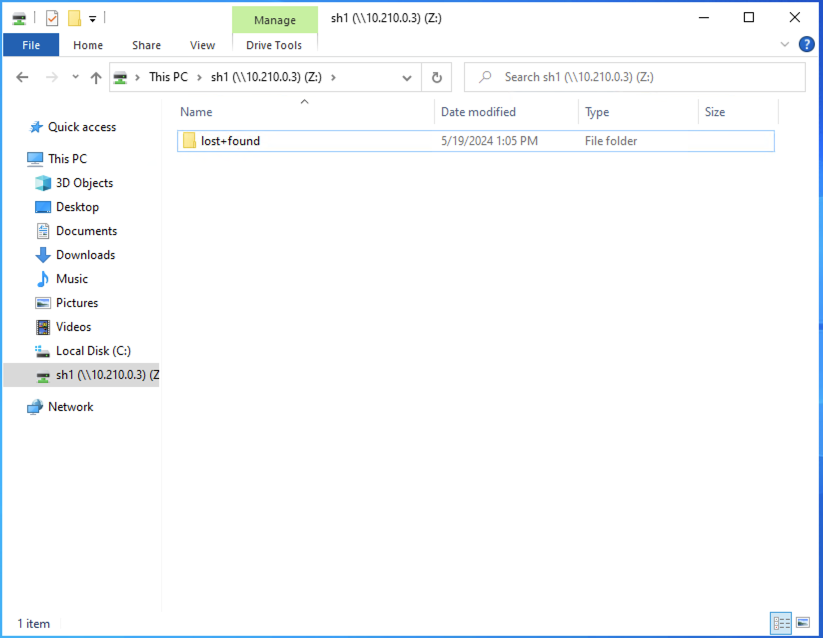
A window showing the contents of the share will open, allowing you to perform file operations, such as copying files to and from the share:
-
-
Verify Access and Permissions:
Verify that the share is accessible and writeable, by creating the files and folders used in the performance test later on.
-
Create a directory called
dataon the share by right-clicking inside the window and selecting New > Folder: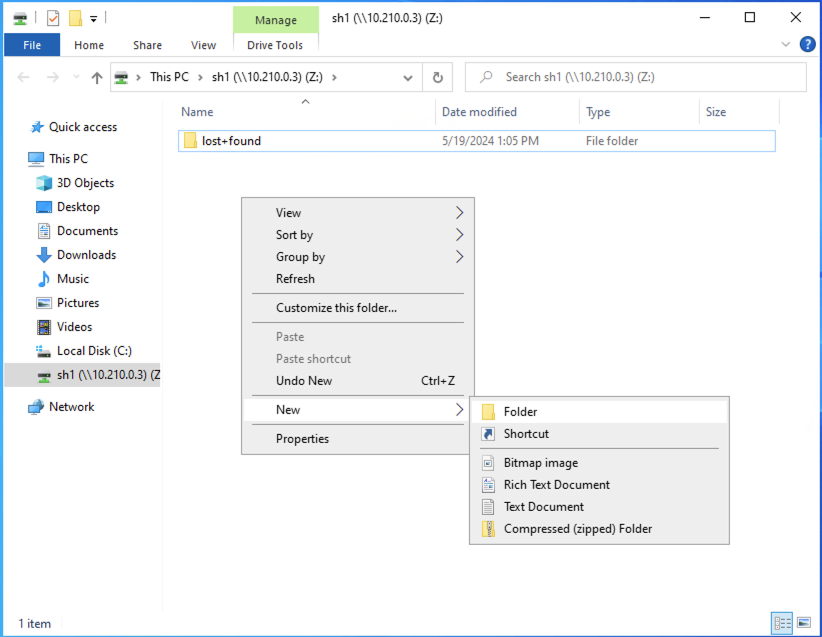
Type
dataas the folder name, and press Enter: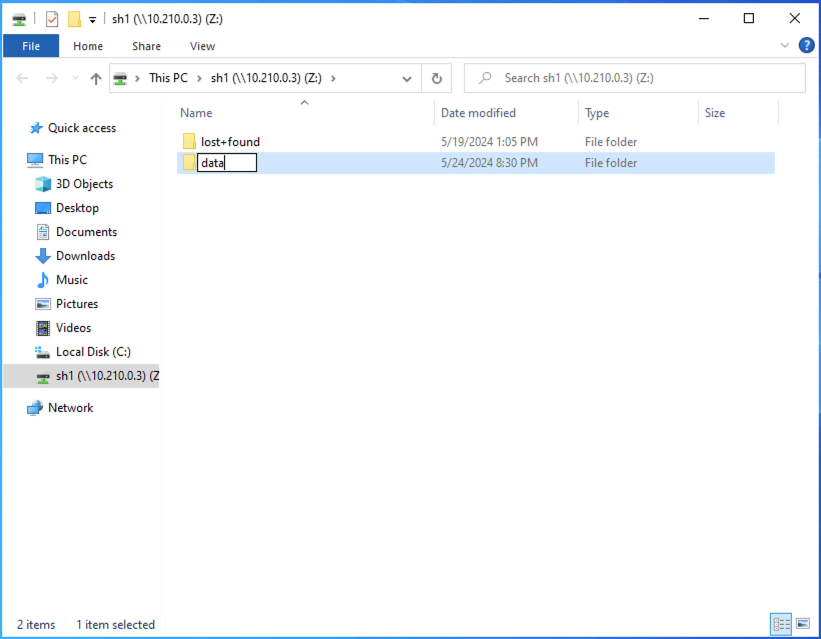
-
Open Notepad, and paste in the following content:
[sequential-write]
rw=write
size=1G
direct=1
directory=/data
numjobs=5
group_reporting
name=sequential-write-direct
bs=8192k
runtime=60

[sequential-read]
rw=read
size=1G
direct=1
directory=/data
numjobs=5
group_reporting
name=sequential-read
bs=8192k
runtime=60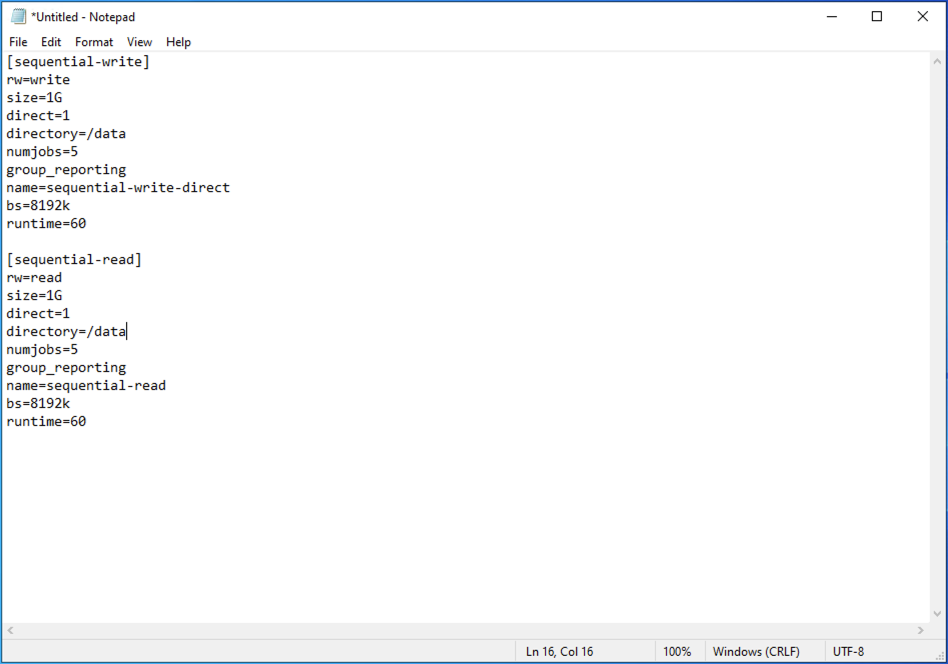
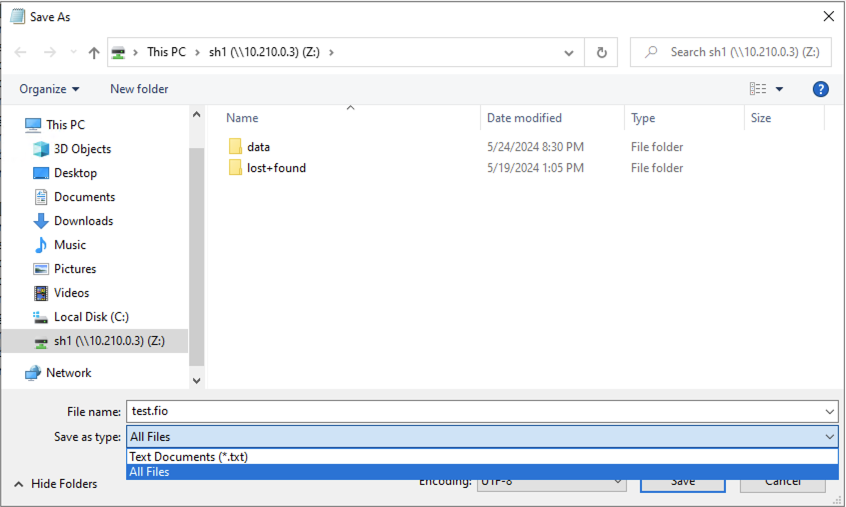
Click File > Save As..., and in the dialog that opens:
- Navigate to the Z: drive
- In the File Type dropdown, select All Files
- In the File Name field, type
test.fio - Click Save
Verify that the
datafolder and thetest.fiofile are present on drive Z: (the file extension may be hidden, depending on your File Explorer settings):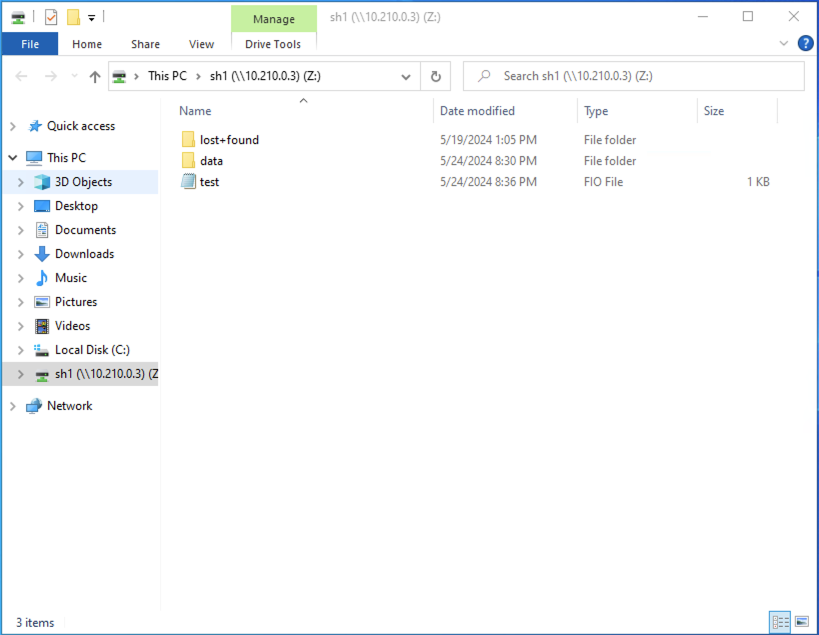
-
If you've completed these steps, you've successfully connected to Fusion SMB, and validated that the file share is accessible and writeable. You can now proceed to more advanced testing and benchmarking.
Testing and Benchmarking
Now that you have Fusion SMB set up and connected to a client machine, you can test its performance and benchmark its capabilities. The following sections outline basic tests to help assess the server's performance in your environment.
Testing Process:
- Measure Network Throughput with
iperf - Measure Share Throughput with
fio
Network Throughput Test with iperf
-
Install
iperfon the server and the client:-
On the server: Use your package manager to install
iperf3(the following example is for Debian or Ubuntu; for other distributions, use the appropriate package manager):sudo apt update
sudo apt install iperf3 -
On the client: Download the latest release of
iperf3for Windows from here, and extract it to
C:\iperf3.
-
-
Run the test:
- On the server, in a new terminal, start the
iperf3server:iperf3 -s - On the client, open a command prompt, and run the following command to connect to the server (replace
10.210.0.3with the IP address of your server):C:\> C:\iperf3\iperf3.exe -c 10.210.0.3
- On the server, in a new terminal, start the
The test will run for a few seconds, and its output will resemble:
C:\> iperf3.exe -c 10.210.0.3
Connecting to host 10.210.0.3, port 5201
[  5] local 10.210.0.2 port 49837 connected to 10.210.0.3 port 5201
[ ID] Interval           Transfer     Bitrate
[  5]   0.00-1.00   sec   206 MBytes  1.72 Gbits/sec
[  5]   1.00-2.00   sec   227 MBytes  1.90 Gbits/sec
[  5]   2.00-3.00   sec   230 MBytes  1.93 Gbits/sec
[  5]   3.00-4.01   sec   231 MBytes  1.92 Gbits/sec
[  5]   4.01-5.00   sec   226 MBytes  1.92 Gbits/sec
[  5]   5.00-6.01   sec   238 MBytes  1.98 Gbits/sec
[  5]   6.01-7.00   sec   234 MBytes  1.98 Gbits/sec
[  5]   7.00-8.01   sec   238 MBytes  1.98 Gbits/sec
[  5]   8.01-9.00   sec   233 MBytes  1.97 Gbits/sec
[  5]   9.00-10.01  sec   229 MBytes  1.91 Gbits/sec
- - - - - - - - - - - - - - - - - - - - - - - - -
[ ID] Interval           Transfer     Bitrate
[  5]   0.00-10.01  sec  2.24 GBytes  1.92 Gbits/sec                  sender
[  5]   0.00-10.03  sec  2.24 GBytes  1.92 Gbits/sec                  receiver

iperf Done.
From the output, you can determine the maximum network throughput between the server and the client. In this example, the throughput is around 1.92 Gbits/sec, which is about 240 MB/s.
SMB Throughput Test with fio
To test the throughput of your SMB share, you can use the popular fio tool. It allows you to simulate various I/O patterns and measure the performance of file I/O, making it ideal for evaluating the performance of an SMB server.
The configuration file test.fio you created earlier contains two jobs: one for sequential writes and another for sequential reads. These jobs will write and read 5 GB of data to and from the share (1 GB per job, with 5 jobs each).
-
Install
fioon the client:On the client, download the latest release of
fiofor Windows from here. The installer will extract it to
C:\Program Files\fio. -
Run the test:
noteStarting with Windows 11 24H2 and Windows Server 2025, clients require SMB message signing by default, which might affect client performance and skew the results. To ensure accurate results, disable message signing on the client by running the following PowerShell command:
Set-SmbClientConfiguration -RequireSecuritySignature $falseRun the
fiotool with the configuration file you've created earlier:C:\> Z:
Z:\> "C:\Program Files\fio\fio.exe" test.fio
The output will resemble:
fio-3.37
Starting 10 threads
sequential-write-direct: Laying out IO file (1 file / 1024MiB)
sequential-write: Laying out IO file (1 file / 1024MiB)
sequential-write: Laying out IO file (1 file / 1024MiB)
sequential-write: Laying out IO file (1 file / 1024MiB)
sequential-write: Laying out IO file (1 file / 1024MiB)
sequential-read: Laying out IO file (1 file / 1024MiB)
sequential-read: Laying out IO file (1 file / 1024MiB)
sequential-read: Laying out IO file (1 file / 1024MiB)
sequential-read: Laying out IO file (1 file / 1024MiB)
sequential-read: Laying out IO file (1 file / 1024MiB)
Jobs: 5 (f=2): [_(5),f(2),R(1),f(1),R(1)][100.0%][r=238MiB/s][r=29 IOPS][eta 00m:00s]
sequential-write-direct: (groupid=0, jobs=10): err= 0: pid=3348: Thu May 23 12:42:54 2024
  read: IOPS=25, BW=205MiB/s (215MB/s)(5120MiB/25026msec)
    slat (usec): min=330, max=8734, avg=678.68, stdev=656.30
    clat (msec): min=92, max=341, avg=189.41, stdev=27.46
     lat (msec): min=92, max=346, avg=190.09, stdev=27.58
    clat percentiles (msec):
     |  1.00th=[  110],  5.00th=[  153], 10.00th=[  163], 20.00th=[  169],
     | 30.00th=[  176], 40.00th=[  182], 50.00th=[  188], 60.00th=[  194],
     | 70.00th=[  203], 80.00th=[  211], 90.00th=[  222], 95.00th=[  232],
     | 99.00th=[  262], 99.50th=[  271], 99.90th=[  342], 99.95th=[  342],
     | 99.99th=[  342]
   bw (  KiB/s): min=97661, max=327045, per=100.00%, avg=213054.79, stdev=9158.66, samples=242
   iops        : min=   11, max=   39, avg=23.82, stdev= 1.21, samples=242
  write: IOPS=27, BW=218MiB/s (229MB/s)(5120MiB/23474msec); 0 zone resets
    slat (msec): min=79, max=353, avg=180.41, stdev=31.09
    clat (nsec): min=634, max=5567.9k, avg=62988.34, stdev=271977.83
     lat (msec): min=79, max=353, avg=180.48, stdev=31.11
    clat percentiles (nsec):
     |  1.00th=[   1012],  5.00th=[   1464], 10.00th=[   1688],
     | 20.00th=[   2064], 30.00th=[   2512], 40.00th=[   3024],
     | 50.00th=[   3856], 60.00th=[  19584], 70.00th=[  29056],
     | 80.00th=[  63744], 90.00th=[ 130560], 95.00th=[ 205824],
     | 99.00th=[ 782336], 99.50th=[1679360], 99.90th=[5537792],
     | 99.95th=[5537792], 99.99th=[5537792]
   bw (  KiB/s): min=144571, max=324207, per=100.00%, avg=226041.45, stdev=8452.16, samples=228
   iops        : min=   14, max=   37, avg=25.31, stdev= 1.11, samples=228
  lat (nsec)   : 750=0.16%, 1000=0.23%
  lat (usec)   : 2=8.67%, 4=16.09%, 10=3.05%, 20=1.80%, 50=8.67%
  lat (usec)   : 100=3.98%, 250=5.39%, 500=1.02%, 750=0.39%, 1000=0.16%
  lat (msec)   : 2=0.31%, 10=0.08%, 100=0.39%, 250=48.52%, 500=1.09%
  cpu          : usr=0.00%, sys=0.00%, ctx=0, majf=0, minf=0
  IO depths    : 1=100.0%, 2=0.0%, 4=0.0%, 8=0.0%, 16=0.0%, 32=0.0%, >=64=0.0%
     submit    : 0=0.0%, 4=100.0%, 8=0.0%, 16=0.0%, 32=0.0%, 64=0.0%, >=64=0.0%
     complete  : 0=0.0%, 4=100.0%, 8=0.0%, 16=0.0%, 32=0.0%, 64=0.0%, >=64=0.0%
     issued rwts: total=640,640,0,0 short=0,0,0,0 dropped=0,0,0,0
     latency   : target=0, window=0, percentile=100.00%, depth=1

Run status group 0 (all jobs):
   READ: bw=205MiB/s (215MB/s), 205MiB/s-205MiB/s (215MB/s-215MB/s), io=5120MiB (5369MB), run=25026-25026msec
  WRITE: bw=218MiB/s (229MB/s), 218MiB/s-218MiB/s (229MB/s-229MB/s), io=5120MiB (5369MB), run=23474-23474msec
From the output, you can determine the read and write throughput of the share.
These steps can help diagnose network or I/O bottlenecks and validate that your Fusion SMB configuration meets performance expectations.
In this example, the write throughput is approximately 229 MB/s, and the read throughput is around 215 MB/s, indicating a successful result. Ideally, these values should be close to the maximum network throughput determined earlier with iperf, allowing for minor degradation due to network protocol overhead.
Conclusion
In this guide, you've learned how to quickly set up and evaluate Fusion SMB in a simple, single-server configuration. You've also learned how to test the server's performance using iperf and fio, and how to connect to the server from a Windows client, allowing you to assess the server's capabilities and suitability for your needs.
For further configuration options, more advanced setups, or any questions you might have, please refer to the official documentation, or contact your sales or support representative.