Active Directory Integration
Introduction
This guide explains how to configure Fusion SMB to authenticate users against Active Directory.
What You'll Learn in This Guide
By following this guide, you will learn:
-
How to join your Fusion SMB to an Active Directory domain:
You'll use industry-standard command line utilities to join the server to your Active Directory domain, and configure the server's computer account.
-
How to use Active Directory for user authentication in Fusion SMB:
You'll configure Fusion SMB to authenticate users against Active Directory, enabling access to SMB shares using their domain credentials.
-
How to test Active Directory integration:
You'll test that Fusion SMB can communicate with the domain controller, confirming that users can authenticate against Active Directory.
Prerequisites
Before you begin, ensure the following prerequisites are met:
-
A working Active Directory domain:
You should have a functional Active Directory domain with a domain controller that is reachable from the server you want to join to the domain.
-
An installation of Fusion SMB:
You should have Fusion SMB installed on the same network as your Active Directory domain controller. If not yet installed,follow the instructions in the Quickstart and Evaluation Guide.
Joining the Domain and Adding UPN
This section guides you through the process of joining Fusion SMB to an Active Directory domain using SSSD and
adcli. (While net from the Samba suite is supported, it is not covered in this guide.)
-
Install the necessary packages:
sudo apt -y update && sudo apt upgrade -y
sudo apt -y install sssd-ad sssd-tools realmd adcli krb5-user sssd-krb5 -
Set the hostname to the FQDN of the server (we will use
fusion-srv.acme.local):sudo hostnamectl set-hostname fusion-srv.acme.local -
Configure Kerberos by editing the /etc/krb5.conf file. Note that the
default_realmshould match the domain name in uppercase:[libdefaults]
default_realm = ACME.LOCAL
rdns = false -
Verify that the domain can be discovered by running the following command:
sudo adcli info acme.localThe output should be similar to:
[domain]
domain-name = acme.local
domain-short = ACME
domain-forest = acme.local
domain-controller = DC1.acme.local
domain-controller-site = Default-First-Site-Name
domain-controller-flags = pdc gc ldap ds kdc timeserv closest writable full-secret ads-web
domain-controller-usable = yes
domain-controllers = DC1.acme.local
[computer]
computer-site = Default-First-Site-Name -
Create a configuration file for SSSD at /etc/sssd/sssd.conf, replacing
acme.localwith your domain name. Ensure thekrb5_realmparameter is in uppercase:[sssd]
domains = acme.local
config_file_version = 2
services = nss
[domain/acme.local]
ad_domain = acme.local
krb5_realm = ACME.LOCAL
cache_credentials = True
id_provider = ad
krb5_store_password_if_offline = True
ldap_id_mapping = True
use_fully_qualified_names = false
access_provider = ad -
Set the permissions on the SSSD configuration file, so that only root can read it:
sudo chmod 600 /etc/sssd/sssd.conf -
Run the following command to create a computer account and generate a krb5.keytab file for the server. We will use
fusion-srvas the server's computer account name. The domain and the computer name must be in uppercase:sudo adcli join --domain ACME.LOCAL --service-name=cifs --computer-name FUSION-SRV --host-fqdn fusion-srv.ACME.LOCAL -v -
Enable and restart the SSSD service:
sudo systemctl enable sssd
sudo systemctl restart sssd -
Confirm that the computer is part of the domain and can query the domain controller, by querying for information about a user (e.g.,
johndoe):id johndoeThe output should be similar to:
uid=1414601123(johndoe) gid=1414600513(domain users)
groups=1414600513(domain users),1414601115(testgroup)
-
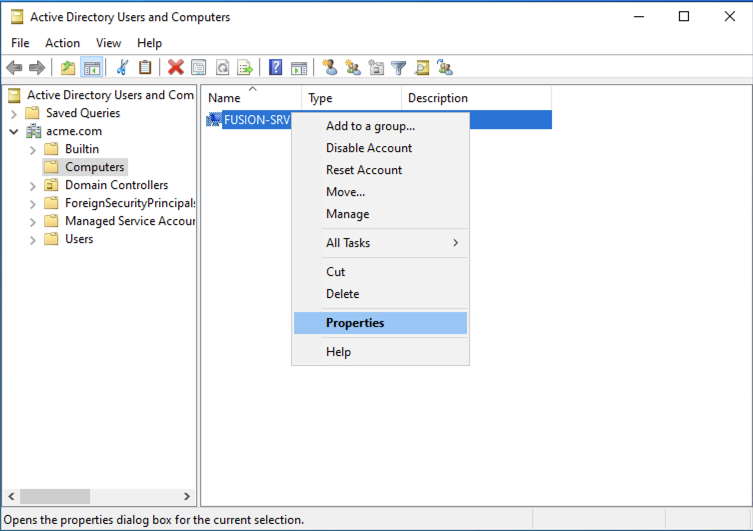
Open the Active Directory Users and Computers console, and right click on the
FUSION-SRVcomputer account, and then click on Properties:
-
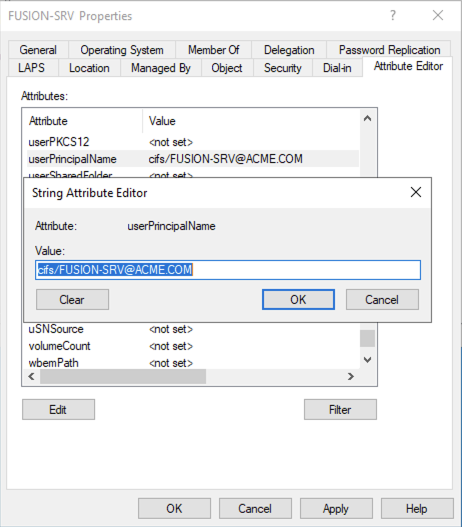
Open the Attribute Editor tab, and find the
userPrincipalNameattribute. Click on Edit: note
noteIf you don't see the Attribute Editor tab, enable it by clicking on View > Advanced Features in the Active Directory Users and Computers console.
-
Make sure the
userPrincipalNameattribute is set to the tocifs/[email protected](replace the domain name and the computer name with your own), and click OK.
Alternatively, you can use PowerShell:
Set-ADComputer -Identity FUSION-SRV -UserPrincipalName cifs/[email protected]
Configuring Tuxera Fusion SMB
With the server now part of the Active Directory domain, you can configure Fusion SMB for use with Active Directory authentication.
-
Edit your configuration file (e.g.,
/etc/tsmb.conf), and add or modify the following parameters:### GLOBAL CONFIGURATION ###
[global]
. . .
# Perform authentication with Active Directory
userdb_type = ad
# The domain name
domain = acme.local
# The computer account name that clients will use to connect to SMB shares
server_name = fusion-srv
# Configure logging (for testing and diagnostics)
log_destination = file
log_level = 40
log_params = path=/var/log/tsmb.log,long,timestamp,time_usec=false,tid,trace,sensitive_data=strip
. . .
[/global]In the annotated example above, we have configured the following:
- The
userdb_typeparameter is set toad:
This parameter indicates that Active Directory will be used for user authentication. - The
domainparameter is set toacme.local:
This parameter refers to the Active Directory domain. Replaceacme.localwith your domain name. - The
server_nameparameter is set tofusion-srv:
This parameter refers to the computer account name created when the server joined Active Directory. This is the name clients will use to connect to SMB shares.
- The
[Optional] Testing Active Directory Integration
This section describes how to validate the integration of Fusion SMB with Active Directory by performing connectivity and authentication tests.
-
First, make sure that domain controller is discoverable via DNS.
Check for the SRV record for
_kerberos._tcpfor your domain:nslookup -q=srv _kerberos._tcp.acme.localThe output should be similar to:
Server:         127.0.0.53
Address:        127.0.0.53#53

Non-authoritative answer:
_kerberos._tcp.acme.local   service = 0 100 88 dc1.acme.local.

Authoritative answers can be found from:
Then, check for the SRV record for
_kpasswd._tcpfor your domain:nslookup -q=srv _kpasswd._tcp.acme.localThe output should be similar to:
Server:         127.0.0.53
Address:        127.0.0.53#53

Non-authoritative answer:
_kpasswd._tcp.acme.local    service = 0 100 464 dc1.acme.local.

Authoritative answers can be found from: -
Check that you are able to obtain tickets for the
cifsservice:sudo kinit -k -V cifs/[email protected] -t /etc/krb5.keytabThe output should be similar to:
keytab specified, forcing -k
Using default cache: /tmp/krb5cc_0
Using principal: cifs/[email protected]
Using keytab: /etc/krb5.keytab
Authenticated to Kerberos v5 -
Check that the key version number (KVNO) for the
cifsservice matches between KDC and the keytab file:sudo klist -k -t /etc/krb5.keytabThe output should be similar to:
Keytab name: FILE:/etc/krb5.keytab
KVNO Principal
---- --------------------------------------------------------------------------
   2 [email protected]
   2 [email protected]
   2 [email protected]
   2 [email protected]
   2 [email protected]
   2 [email protected]
   2 cifs/[email protected]
   2 cifs/[email protected]
   2 cifs/[email protected]
   2 cifs/[email protected]
   2 cifs/[email protected]
   2 cifs/[email protected]

. . . -
Check that you are able to obtain tickets for user accounts (e.g.,
johndoe):sudo kinit -V [email protected]The output should be similar to:
Using default cache: /tmp/krb5cc_0
Using principal: [email protected]:
Authenticated to Kerberos v5
Then, list the tickets:
sudo klistThe output should be similar to:
Ticket cache: FILE:/tmp/krb5cc_0
Default principal: [email protected]

Valid starting       Expires              Service principal
06/01/2024 14:42:22  06/02/2024 00:42:22  krbtgt/[email protected]
renew until 06/08/2024 14:42:12 -
Now, you can temporarily start Fusion SMB on the node, to validate domain authentication further.
-
First, start Fusion SMB on the node:
sudo /usr/sbin/tsmb-server -
Then, from a Windows client, try to access the share using the
johndoeuser account. You should be able to map the share to a drive letter, and read data from the share. -
After testing, stop Fusion SMB by pressing
Ctrl-Cin the terminal. -
Examine the logs at
/var/lib/tsmb/tsmb.logto see if there there was a successful LDAP connection to the domain controller. The log should contain lines similar to:
Using principal [email protected] for AD client
Resolving SRV RR _ldap._tcp.acme.local
Found URI[0]: ldap://dc1.acme.local:389
Resolving SRV RR _gc._tcp.acme.local
Found URI[0]: ldap://dc1.acme.local:3268
Trying ldap://dc1.acme.local:389
Connected to ldap://dc1.acme.local:389
Our domain SID S-1-5-21-788087510-3421900764-663072633
Our domain NETBIOS-Name 'ACME'- You should also see a ticket inside Fusion SMB's ticket cache at
/var/lib/tsmb/tsmb_ccache. You can examine it by running:
sudo klist -c /var/lib/tsmb/tsmb_ccacheThe output should be similar to:
Ticket cache: FILE:/var/lib/tsmb/tsmb_ccache
Default principal: [email protected]

Valid starting       Expires              Service principal
06/01/2024 14:52:32  06/01/2024 15:52:32  krbtgt/[email protected]
06/01/2024 14:52:32  06/01/2024 15:52:32  ldap/dc1.acme.local@
06/01/2024 14:52:32 06/01/2024 15:52:32 ldap/[email protected] -