Simple guide to evaluation
Minimum system requirements for evaluation
Fusion File Share (sometimes referred to as Tuxera SMB or tsmb) is compatible with any distribution of Linux. The application can be run directly on physical hardware, within a virtual machine or as a containerised application utilising the likes of Docker.
The basic system requirements are:
- 500 MHz CPU
- 32 MB of available RAM
Fusion File Share can be built for any CPU architecture; most commonly we build for AMD64 (x86-64), ARM64 & IBM POWER architectures.
The application can run in a clustered ‘scale-out’ mode - to offer redundancy, load balancing and failover functionality - as well as in standalone mode. Generally, we recommend running in a standalone configuration during the initial evaluation to reduce complexity, with scale-out options explored later.
Questionnaire
As part of your evaluation, we will send you a questionnaire to establish details about your existing infrastructure as well as to understand specific features you may need, such as support for RDMA, the GPFS file system, etc.
Commands to establish your platform
We also ask that you run the following series of commands from the console on one of the Linux instances on which Fusion File Share will be run:
(lsb_release -ds || cat /etc/*release || cat /etc/*_version || uname -om) 2>/dev/nullecho $HOSTTYPE; file $(readlink -f $(which cat))gcc -v
We build every copy of Fusion File Share on a bespoke basis, and by providing us with the output from running these commands we can ensure you are presented with an evaluation that is 100% compatible and appropriate for your chosen platform.
What the evaluation package of FFS consists of
Once we have built your custom evaluation of Fusion File Share, we will provide a tarball archive containing a series of binaries, a configuration file and some basic documentation. What’s included will vary, but every evaluation will include the following at a minimum:
- tsmb-server – Tuxera SMB server (Fusion File Share) user space application.
- tsmb.conf – Configuration file, for defining global settings and per-share settings.
- tsmb-acls - Utility to control Access Control Lists.
- tsmb-cfg – Utility to alter the Fusion configuration in real-time.
- tsmb-passwd– Utility to create and configure local tsmb user accounts.
- tsmb-privilege – Utility to manage the privilege database.
- tsmb-status – Utility for showing tsmb server statistics.
- LICENSES.SMB – Licencing information for 3rd party software components included.
- README.SMB – Basic information concerning installing and initial configuration of Fusion File Share.
Global configuration of tsmb.conf
tsmb.conf is the central configuration file that defines all global and share-specific settings. Your delivery of Fusion File Share will include a readme file as well as comprehensive documentation explaining where to copy this file to and how to configure it. In a standalone non-cluster setup, the tsmb.conf file is typically copied into /etc/ and so to edit it in this instance you can run the following:
sudo nano /etc/tsmb.conf
Some of the basic settings you can add, uncomment or reconfigure under the [global] (and before the [/global]) section of tsmb.conf are:
| userdb_type = ad, text | Defines user authentication system to use. Can be defined as 'ad' (Active Directory), 'text' (local auth db) or both as in the example. |
| userdb_file = /etc/tsmb-userdb.txt | If local user database is set, these credentials are stored in defined location. |
| domain = tuxera-labs.net | Sets the Active Directory domain, if 'userdb_type = ad' has been specified. |
| server_name = ffs1 | Sets the hostname in the Fusion. configuration |
| scale_out = false | Fusion's default is to expect to be in a HA cluster - setting this parameter allows the standalone non-clustered application. |
Adding shares via tsmb.conf
As above, having run the following:
sudo nano /etc/tsmb.conf
Share instances are configured at the bottom of tsmb.conf, where each entry begins with [share] and ends with [/share]. The below table gives an example with explanation as to the basic mandatory configuration of a share:
| [share] | |
| netname = TEST4 | Defines the share name that will be visible to client applications accessing the Fusion server, such as Windows Explorer. |
| remark = Test Share 4 | Specifies a human-readable comment describing this share that can be shown in client applications. |
| path = /shares/test4 | Path is the absolute path in the locally accessible file system that becomes the share’s root directory. |
| permissions = everyone:full | Configures the share with full access for everyone (see manual for more comprehensive information). |
| [/share] |
Adding local users using 'tsmb-passwd'
Fusion File Share supports two primary user authentication methods - Microsoft Active Directory integrated, and local user accounts which are stored in a local encrypted database. The path of this database must be configured in the global section of the tsmb.conf file, as has been described above.
Adding a local account is a simple process which utilises the tsmb-passwd binary delivered to you (which should be copied into an appropriate system-wide executable directory).
Running the following will create a user account called 'Fox':
sudo tsmb-passwd -a Fox
You will be prompted to enter your chosen password twice, then this account will be created in the local user database.
To view a list of the user accounts already created locally, run the following command:
sudo tsmb-passwd --list
tsmb-passwd has many other options, and these can be listed and described by running:
sudo tsmb-passwd -h
How to check for extended attributes on a filesystem
By default, Fusion utilises extended attributes to store mapped ACLs (Access Control Lists) and other related metadata. To check that extended attributes are available on your Linux platform we can use the getfattr command. To run a recursive check for extended attributes on a whole directory, the command would be:
getfattr -d -m "-" -R /path/to/directory
This will show onscreen the extended attribute status of the folder, sub-folder(s) and all files in this defined directory. Removing the '-R' will just check the defined directory only.
To check whether an individual file has extended attributes enabled:
getfattr -d -m "-" /path/to/file.txt
If an error appears on screen that getfattr does not exist, this can be installed via your Linux distribution's package manager - in the case of Ubuntu:
sudo apt install getfattr
Running the 'tsmb-server' binary
In an enterprise configuration, it is most common to run Fusion in foreground or daemonised mode.
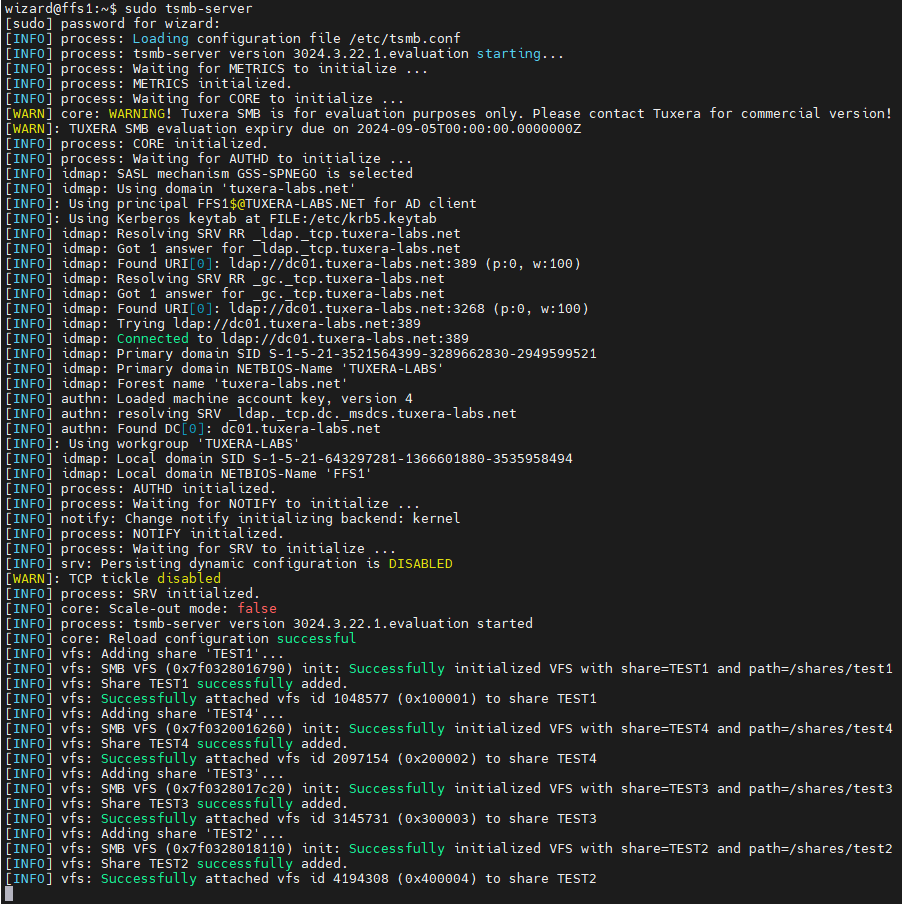
Foreground mode: when tsmb-server is executed from the command shell in this mode, the application will retain focus until it is halted. Provisional configuration information (such as AD integration details and share configurations) will be displayed on screen (see Fig 1.1).
If tsmb-server has been copied to the suggested directory in the manual (/usr/sbin/) and tsmb.conf is located in /etc/ then Fusion can be executed in foreground mode by running:
sudo tsmb-server
If your configuration differs from this, follow the example below:
sudo /custom/path/tsmb-server -c /custom/path/tsmb.conf
Daemonised mode - in this mode, tsmb-server can be run in the background and will not take over the command shell, allowing you to carry out other tasks on the system without having to kill the tsmb-server process. To execute in this mode, run as follows:
sudo tsmb-server -B -c /path/to/tsmb.conf
As shown below, this will provide a far more truncated screen output on execution, and then return you to the command shell prompt with the service now operating in the background:

How to check for RDMA, multichannel & RSS support in Windows client
SMB Direct is a technology that bypasses the TCP/IP stack and allows utilisation of RDMA (Remote Direct Memory Access) between client and server. RDMA support is only included in certain versions of Windows 10/11, which is covered in more detail in KNOW-95 [link to follow on article completion and publication]
From the PowerShell, running the following command on an RDMA supported instance of Windows will indicate (in the third column of the output, as shown in the below screenshot) whether the NICs on your system are RDMA capable or not:
Get-SMBClientNetworkInterface

SMB Multichannel is an integral part of the SMB 3.0 protocol. It allows multiple connections to be made simultaneously on the same network interface, as well as across multiple network interfaces. This offers benefits including increased bandwidth, individual CPU core load reduction and fault-tolerance (for example, if two or more NICs are in operation and one goes down, the other carries on maintaining the connection and SMB traffic without a dropout).
Unlike SMB Direct, Multichannel requires little to no configuration. It is available in Windows releases that include SMB 3.0 – Windows Server 2012, and Windows 8 on the client side (and higher).
To establish that Multichannel is active, run the following command from the PowerShell:
Get-SmbClientConfiguration | Select EnableMultichannel
If Multichannel is enabled, the output will show as ‘True’:

In an eventuality where 'EnableMultichannel' is shown as false, it can be re-enabled from the PowerShell by running:
Set-SmbServerConfiguration -EnableMultiChannel $true -Confirm:$false
Then re-run the previous command to check that Multichannel has now been enabled.
RSS – Receive Side Scaling works with Multichannel to load balance separate TCP/IP streams across multiple CPU cores in the system. Without RSS operational, Multichannel will allocate all streams to a single CPU core per network interface. This can cause a significant bottleneck to performance, particularly where a single very high speed NIC is utilised. For example, a system with a single 100Gbps Mellanox NIC that is not utilising RSS would only use 1 CPU core, and is likely to hit CPU saturation long before hitting the NICs top data rate of 100Gbps.
To establish whether RSS is available and on what NICs on your system, run the following from the PowerShell:
Get-SmbClientNetworkInterface
The second column should indicate which adapters have RSS capability:

How to establish max output of network
There are multiple utilities that allow the assessment of network speed. iperf2 (not to be confused with iperf3, which is not a version upgrade but a branched and therefore different product) is a particularly useful tool for assessing network performance. It is compatible with Windows, MacOS and Linux, and executes entirely in RAM, removing the possibility that local storage may create a bottleneck not reflective of actual network bandwidth.
At the simplest level, iperf2 is run between two endpoints (a server side and a client side) connected by the network infrastructure. In the context of Fusion, this will normally be a Linux instance on the server side, and an end-user system on the client side, such as Windows 10 or MacOS 14.
It's important to remember that any system that might be operating on the same network has the potential to influence these results. Running the test between the two endpoints with no other servers or client system utilising the same network is key for obtaining an accurate result.
In the following example, Ubuntu 22.04 LTS is in operation on the server side, and Windows 10 Pro is in operation on the client side.
-
Install iperf2 on the Ubuntu instance by running:
sudo apt install iperf
At time of writing, this should install iperf2 from the apt repository. -
Download iperf2 for Windows from a trusted online resource. We cannot advise on third party links (and application is installed at the risk of the user).
-
On the Ubuntu instance, run the following in order to put it into iperf2 'server' mode:
sudo iperf -s
Text in the console will confirm that the iperf2 server is listening on TCP port 5001. -
On the Windows 10 Pro system, from a Command or PowerShell Prompt, browse to the directory where iperf2 has been downloaded and run the following (assuming download has been renamed iperf2.exe):
iperf2 -c <server_ip_address> -
By default, the connection between the client and server iperf2 instances will exchange data for 10 seconds, and then display network performance results on both the server and client, showing the size of the data transfer and the average bandwidth speed:
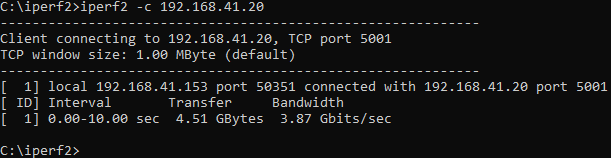
Fig 1.6 - the output on the client side of iperf2 having carried out a 10 second transfer test with the server.
There are many further parameters and options that can be configured to assess network performance, but these steps demonstrate its simplest functionality. To see a list of all the parameters and options that can be set, run the following:
iperf -h
TODO: add link to performance tuning KB article when available.
How to establish max output of storage
As with testing the bandwidth of the network, there are many different tools that exist to test the performance of storage accessible from a given Linux instance running Fusion File Share.
One such example is fio. The following steps provide an example of how to install and use fio to test the local storage performance on an Ubuntu 22.04 LTS instance:
-
Install fio:
sudo apt install fio -
Create a test file to use with fio. Using nano or your preferred text editor, create a file called 'fio-test.ini' with the following content:
[global]
ioengine=libaio
direct=1
size=1G
filename=fio-test-file

[job1]
rw=readbs=4k

[job2]rw=writebs=4k
When used, this test file is configured to bypass the OS cache, and utilise a 1GB test file size with sequential read and write operations using a 4KB block size.
-
Run the fio instance with the test file (adjust path to .ini file as required):
sudo fio fio-test.inifio will run for a short while, and once complete will display extensive results. In amongst these will be the read / write speeds, as shown in the screenshot below:

Fig 1.7 - a truncated snapshot showing read and write speeds in fio output.